top of page

Nicole Hamraev 

DIGITAL MATERIAL CULTURE 

2022-2023

31.10.2022

In my work I decided to test the speed of laser cutting in wood, what I did was measure times how long it takes for the laser to cut the wood at different speed intensities. The power as you can see in the picture remains the same but only the speed has changed and it varies between 2 4 8 and 16 you can see how the time changes

7.11.2022
 

In this work I decided to make connectors in the form of a girl, I wanted to create a game for children for connections. I made the shape of the girl in an AutoCAD file that you can download and see

IMG_1010.JPG

AutoCad file

14.11.2022
 

In this work I decided to create a connector model. The model reaches a height of about 70 centimeters. I did the laser cutting. Conclusions: I had to reduce the parts between the connectors in order for them to fit better, some of the parts fit well and some I had to stick with glue.
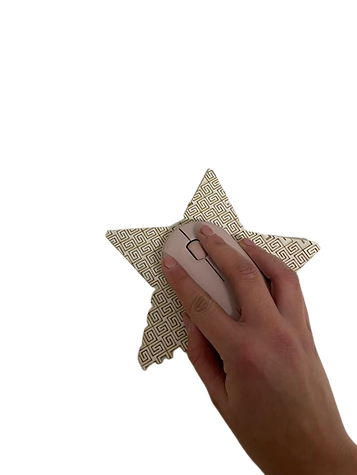
21.11.2022
 

I decided to create a cushion for a computer mouse in the shape of a star and I used a method that would produce the cushion in a flexible and comfortable way. The shape inside is dense and allows flexibility and thus the mouse can move freely

AutoCad file

תמונה_של_כוכב_עם_עכבר-removebg-preview.png
תמונה_של_הכוכב-removebg-preview.png

In the last task I decided to take the folding and engraving  technique and thus create a figure in 3D, what I did was first of all lay out the figure and then print it with laser cutting. The second thing I did was to number the parts, which I would later do on the layout so that I would know which part sticks to which part and which part should be folded up or below I took help of the internet for this task and really enjoyed this technique.

I decided to make a character of a mouse because in the previous task I made a pad for a computer mouse and therefore I thought of a creative way to stay in the same theme

24.11.2022
 

Modeling a 3d object that cannot be produced by molding

In my work I decided to create a shape of a flower consisting of three different sizes which are connected to each other and create a new and interesting shape .I modeled the object in Rhino, and the modeling can be seen in the attached file. 

drawing of the model

printed model

5.12.2022
 

SLA printing I created a curved surface made of different shapes at different heights, which shows how the shape adapts itself to the curved surface. I am attaching the file and pictures of my surface.

12.12.2022
 

In the third task I decided to go back to the form of the first task and create a circular movement from it. I created a column through which the two flowers can rotate. In the video I posted you can clearly see this .A number of prints were made in which it took me a while to understand how to do it in the most correct way and to save material and supports for printing.

drawing of the model

printed model

19.12.2022
 

In the fourth task I decided to combine the two elements, one is the flower of the first lesson  and the other is the surface technique I did in task number 2 . what I did in the task now was to create a useful tool that can be used therefore I decided to create a vase with the petals of the flower from task number 1 which can also be seen in the leaf from task number 3 The head of the flower sits on the surface and creates a beautiful urn.

drawing of the model

03.01.2023

In our lesson we will create a large chess board from which each team member will have to create one piece of the game. I chose to create the pawn piece, you can see the work process and the file from which you can download the tool in order to create it in cnc

1-removebg-preview.png
2-removebg-preview.png

zoomin to see the details

In our class we were asked to create stamps so I decided to create a hexagonal stamp.you can see the work process and the file from which you can download the tool to create it in cnc

Exercise 1 

const int ledRedPin = 3;

const int ledYellowPin = 4;

const int ledGreenPin = 5;


void setup() {

  pinMode(ledRedPin, OUTPUT);

  pinMode(ledYellowPin, OUTPUT);

  pinMode(ledGreenPin, OUTPUT);

}


void loop() {

  // Red LED

  digitalWrite(ledRedPin, HIGH);

  delay(150);

  digitalWrite(ledRedPin, LOW);

  delay(150);

  digitalWrite(ledRedPin, HIGH);

  delay(150);

  digitalWrite(ledRedPin, LOW);

  delay(100);


  // Yellow LED

  digitalWrite(ledYellowPin, HIGH);

  delay(150);

  digitalWrite(ledYellowPin, LOW);

  delay(150);

  digitalWrite(ledYellowPin, HIGH);

  delay(150);

  digitalWrite(ledYellowPin, LOW);

  delay(100);


  // Green LED

  digitalWrite(ledGreenPin, HIGH);

  delay(150);

  digitalWrite(ledGreenPin, LOW);

  delay(150);

  digitalWrite(ledGreenPin, HIGH);

  delay(150);

  digitalWrite(ledGreenPin, LOW);

  delay(100);

}

Exercise 2

const int ledRedPin = 3;

const int ledYellowPin = 4;

const int ledGreenPin = 5;


const int potentiometerPin = A0;


int potentiometerValue;

int delayTime;


void setup() {

  Serial.begin(9600);


  pinMode(ledRedPin, OUTPUT);

  pinMode(ledYellowPin, OUTPUT);

  pinMode(ledGreenPin, OUTPUT);

}


void loop() {

  potentiometerValue = analogRead(potentiometerPin);

  Serial.println(potentiometerValue);


  // Adjust the potentiometer value for a more significant change in delay

  delayTime = map(potentiometerValue, 0, 1023, 10, 500);


  // Turn on RED

  digitalWrite(ledRedPin, HIGH);

  digitalWrite(ledYellowPin, LOW);

  digitalWrite(ledGreenPin, LOW);


  delay(delayTime);


  // Turn on YELLOW

  digitalWrite(ledRedPin, LOW);

  digitalWrite(ledYellowPin, HIGH);

  digitalWrite(ledGreenPin, LOW);


  delay(delayTime);


  // Turn on GREEN

  digitalWrite(ledRedPin, LOW);

  digitalWrite(ledYellowPin, LOW);

  digitalWrite(ledGreenPin, HIGH);


  delay(delayTime);

}

Exercise 3

#include <Servo.h>


Servo nicoleStepper;


void setup(){


  nicoleStepper.attach (3);

}


void loop(){


nicoleStepper.write(10);

delay(1000);

nicoleStepper.write(150);

delay(1000);

}

The song of Yonatan Hekatem

const int buzz_pin= 3;
const int dtimeL=1000;
const int dtimeS=dtimeL/2;


const int G =392;
const int F =349;
const int E = 329;
const int D =293; 
const int C = 261;
const int B = 246;
const int A = 220;

void setup(){

}


void loop(){

tone(buzz_pin, G ,500);
delay(dtimeS);
tone(buzz_pin, E ,500);
delay(dtimeS);
tone(buzz_pin, E ,500);
delay(dtimeL);
tone(buzz_pin, F,500);
delay(dtimeS);
tone(buzz_pin, D,500);
delay(dtimeS);
tone(buzz_pin, F,500);
delay(dtimeL);
tone(buzz_pin, C,500);
delay(dtimeS);
tone(buzz_pin, D,500);
delay(dtimeS);
tone(buzz_pin, E,500);
delay(dtimeS);
tone(buzz_pin, F,500);
delay(dtimeS);
tone(buzz_pin, G,500);
delay(dtimeS);
tone(buzz_pin, G,500);
delay(dtimeL);
noTone(buzz_pin);

}

Final project

void setup() {
  pinMode(A2, INPUT); // Set pin A2 as input for the temperature sensor
  pinMode(3, OUTPUT); // Set pin 3 as output for the green LED
  pinMode(8, OUTPUT); // Set pin 8 as output for the red LED
  Serial.begin(9600); // Initialize serial communication at a baud rate of 9600
}

void loop() {
  int sensor = analogRead(A2); // Read analog data from pin A2 and store it in 'sensor'
  float voltage = (sensor / 1024.0) * 5; // Convert sensor reading to voltage
  float tempf = (voltage - 0.5) * 100; // Convert voltage to Fahrenheit temperature
  float tempc = (tempf * 1.8) + 32; // Convert Fahrenheit to Celsius temperature

  Serial.print("\ntemp:"); // Print a label for the temperature value
  Serial.print(tempc - 90); // Print the adjusted temperature value (subtracting 90)

  if (tempc < 20) {
    digitalWrite(3, HIGH); // Turn on the green LED
    digitalWrite(8, LOW);  // Turn off the red LED
    Serial.print(" It's Cold."); // Print a message indicating it's cold
  } else if (tempc >= 25) {
    digitalWrite(3, LOW);  // Turn off the green LED
    digitalWrite(8, HIGH); // Turn on the red LED
    Serial.print(" It's Hot."); // Print a message indicating it's hot
  } else {
    digitalWrite(3, LOW);  // Turn off the green LED
    digitalWrite(8, LOW);  // Turn off the red LED
    Serial.print(" It's Fine!"); // Print a message indicating it's fine
  }

  delay(1000); // Delay for 1 second
}
 

bottom of page